linux常用命令(三) 有更新!
- 37套精品Java架构师高并发高性能高可用分布式集群电商缓存性能调优设计项目实战视教程 置顶! 有更新!
- yum 仓库
- /etc/yum.repos.d/CentOS-Base.repo
- wget 网络上下载文件
- 备份替换基础配置
- yum search telnet搜索可用包
- yum install telnet 使用yum安装telnet
- yum list installed | grep telnet
- yum list | grep telnet
- yum remove telnet
- runlevel /etc/inittab
- runlevel
- /etc/inittab
- kchkconfig --list|grep "3:启用"
- chkconfig --list udev-post
- chkconfig udev-post off
- for in ;do ;done ,awk
- sshd_config
- 修改ssh默认配置提高安全。
- /etc/init.d/sshd restart
- iptables stop
- su – root/sudo切换用户
- $PATH 、/etc/profile环境变量
- netstat
- lsof -i 端口 查看端口状态
- jps
- $LANG、/etc/sysconfig/i18n
- ntpdate 时间同步
- date 查看当前系统时间
- date -s 设置时间
- /usr/sbin/ntpdate time.nist.gov
- /etc/crontab与/var/spool/cron 定时任务
- /var/spool/cron/
- crontab 、/etc/crontab系统执行计划
- 添加系统任务
- 保存后提示任务开始执行
- 查看任务
- 删除所有任务
- 服务重启
- 其他
- /etc/security/limits.conf
- /etc/sysctl.conf 内核参数调整配置
- /dev/null
- chattr
- chattr +i aaa.txt锁定文件
- lsattr 查看属性文件
- chattr -i aaa.txt解锁文件
- top
- 按1查看cpu核数
- last lastlog
- last
- lastlog
- ps
- ps -aux
- ps -ef
- 常用参数:
- kill
- kill 1349 结束进程
- kill -9 1349 立即结束进程
- tar
- 常用参数
- 实例
- 修改IP、DNS
- 查看网络MAC地址
- 修改主机名称
- 修改网卡IP为静态IP
- 修改DNS
37套精品Java架构师高并发高性能高可用分布式集群电商缓存性能调优设计项目实战视教程 置顶! 有更新!
yum 仓库
rpm –ivh 安装费劲,不会默认安装依赖包,yum会自动安装依赖包
/etc/yum.repos.d/CentOS-Base.repo
该文件为yum默认安装包下载地址配置文件。
可将其替换为国内知名站点的镜像配置,如163
wget 网络上下载文件
wget http://mirrors.163.com/.help/CentOS6-Base-163.repo
|
[root@master yum.repos.d]# wget http://mirrors.163.com/.help/CentOS6-Base-163.repo --2017-01-25 16:52:27-- http://mirrors.163.com/.help/CentOS6-Base-163.repo 正在解析主机 mirrors.163.com... 123.58.173.185, 123.58.173.186 正在连接 mirrors.163.com|123.58.173.185|:80... 已连接。 已发出 HTTP 请求,正在等待回应... 200 OK 长度:2006 (2.0K) [application/octet-stream] 正在保存至: “CentOS6-Base-163.repo” 100%[======================================================================================>] 2,006 --.-K/s in 0s 2017-01-25 16:52:28 (339 MB/s) - 已保存 “CentOS6-Base-163.repo” [2006/2006]) |
备份替换基础配置
|
[root@master yum.repos.d]# ls CentOS6-Base-163.repo CentOS-Base.repo CentOS-Debuginfo.repo CentOS-Media.repo CentOS-Vault.repo [root@master yum.repos.d]# mv CentOS-Base.repo CentOS-Base.repo.bak [root@master yum.repos.d]# cp CentOS6-Base-163.repo CentOS-Base.repo |
yum search telnet搜索可用包
|
[root@master ~]# yum search telnet perl-Net-Telnet.noarch : Net-Telnet Perl module telnet.x86_64 : The client program for the Telnet remote login protocol telnet-server.x86_64 : The server program for the Telnet remote login protocol krb5-appl-clients.x86_64 : Kerberos-aware telnet, ftp, rcp, rsh and rlogin clients krb5-appl-servers.x86_64 : Kerberos-aware telnet, ftp, rcp, rsh and rlogin servers tn5250.i686 : 5250 Telnet protocol and Terminal tn5250.x86_64 : 5250 Telnet protocol and Terminal Name and summary matches only, use "search all" for everything. [root@master ~]# |
yum install telnet 使用yum安装telnet
|
[root@master yum.repos.d]# telnet -bash: telnet: command not found [root@master yum.repos.d]# yum install telnet Loaded plugins: fastestmirror, refresh-packagekit, security Repository base is listed more than once in the configuration Repository updates is listed more than once in the configuration Repository extras is listed more than once in the configuration ... Running Transaction Installing : 1:telnet-0.17-48.el6.x86_64 1/1 Verifying : 1:telnet-0.17-48.el6.x86_64 1/1 Installed: telnet.x86_64 1:0.17-48.el6 Complete! [root@master yum.repos.d] |
yum list installed | grep telnet
查看已安装的应用
|
[root@master yum.repos.d]# yum list installed | grep telnet telnet.x86_64 1:0.17-48.el6 @base [root@master yum.repos.d]# |
yum list | grep telnet
查看所有应用(包括未安装、已安装)
|
[root@master yum.repos.d]# yum list | grep telnet Repository base is listed more than once in the configuration Repository updates is listed more than once in the configuration Repository extras is listed more than once in the configuration Repository centosplus is listed more than once in the configuration Repository contrib is listed more than once in the configuration telnet.x86_64 1:0.17-48.el6 @base telnet-server.x86_64 1:0.17-48.el6 base |
yum remove telnet
卸载应用
|
[root@master yum.repos.d]# yum remove telnet Loaded plugins: fastestmirror, refresh-packagekit, security Setting up Remove Process |
卸载完应用后
|
[root@master yum.repos.d]# yum list installed | grep telnet [root@master yum.repos.d]# |
但是安装包还在
|
[root@master yum.repos.d]# yum list | grep telnet Repository base is listed more than once in the configuration Repository updates is listed more than once in the configuration Repository extras is listed more than once in the configuration Repository centosplus is listed more than once in the configuration Repository contrib is listed more than once in the configuration telnet.x86_64 1:0.17-48.el6 base telnet-server.x86_64 1:0.17-48.el6 base [root@master yum.repos.d]# |
runlevel /etc/inittab
3为文本命令模式,5为桌面模式
runlevel
查看当前模式
|
[root@master yum.repos.d]# runlevel N 3 |
/etc/inittab
修改启动模式
|
[root@master yum.repos.d]# cat /etc/inittab # Default runlevel. The runlevels used are: # 0 - halt (Do NOT set initdefault to this) # 1 - Single user mode # 2 - Multiuser, without NFS (The same as 3, if you do not have networking) # 3 - Full multiuser mode # 4 - unused # 5 - X11 # 6 - reboot (Do NOT set initdefault to this) # id:3:initdefault: |
kchkconfig --list|grep "3:启用"
查看启动项
|
[root@master ~]# chkconfig --list|grep "3:启用" abrt-ccpp 0:关闭 1:关闭 2:关闭 3:启用 4:关闭 5:启用 6:关闭 abrtd 0:关闭 1:关闭 2:关闭 3:启用 4:关闭 5:启用 6:关闭 acpid 0:关闭 1:关闭 2:启用 3:启用 4:启用 5:启用 6:关闭 atd 0:关闭 1:关闭 2:关闭 3:启用 4:启用 5:启用 6:关闭 auditd 0:关闭 1:关闭 2:启用 3:启用 4:启用 5:启用 6:关闭 autofs 0:关闭 1:关闭 2:关闭 3:启用 4:启用 5:启用 6:关闭 。。。 rsyslog 0:关闭 1:关闭 2:启用 3:启用 4:启用 5:启用 6:关闭 sshd 0:关闭 1:关闭 2:启用 3:启用 4:启用 5:启用 6:关闭 sysstat 0:关闭 1:启用 2:启用 3:启用 4:启用 5:启用 6:关闭 |
chkconfig --list udev-post
|
[root@master ~]# chkconfig --list udev-post udev-post 0:关闭 1:启用 2:启用 3:启用 4:启用 5:启用 6:关闭 |
chkconfig udev-post off
关闭启动项
|
[root@master ~]# chkconfig udev-post off [root@master ~]# chkconfig --list udev-post udev-post 0:关闭 1:启用 2:关闭 3:关闭 4:关闭 5:关闭 6:关闭 |
for in ;do ;done ,awk
使用shell循环语句批量关闭启动项
l awk打印启动项名称
|
[root@master ~]# chkconfig --list|grep "3:启用"|awk '{print $1}' abrt-ccpp abrtd acpid atd auditd autofs blk-availability bluetooth |
l grep -vE 'crond|network|rsyslog|sshd' 反向排除多选项
|
[root@master ~]# chkconfig --list|grep "3:启用"|awk '{print $1}'|grep -vE 'crond|network|rsyslog|sshd' abrt-ccpp abrtd acpid atd auditd autofs blk-availability bluetooth certmonger cpuspeed |
l grep -v "crond\\|network\\|rsyslog\\|sshd" 正则反向排除多项
|
[root@master ~]# chkconfig --list|grep "3:启用"|awk '{print $1}'|grep -v "crond\\|network\\|rsyslog\\|sshd" abrt-ccpp abrtd acpid atd auditd autofs blk-availa |
l for in do 循环处理
|
[root@master ~]# for name in `chkconfig --list|grep "3:启用"|awk '{print $1}'|grep -v "crond\\|network\\|rsyslog\\|sshd"`; do echo name:$name; done name:abrt-ccpp name:abrtd name:acpid name:atd name:auditd name:autofs name:blk-availability name:bluetooth name:certmonger name:cpuspeed name:cups name:haldaemon name:ip6tables name:irqbalance |
处理改成chkconfig $name off;就是批量关闭除了上述四项外的所有启动项。
sshd_config
修改ssh默认配置提高安全。
|
[root@master test]# cat /etc/ssh/sshd_config |
#Port 22 修改连接默认端口
#PermitRootLogin yes root用户是否可以远程登录
#PermitEmptyPasswords no 紧张空密码登录
/etc/init.d/sshd restart
重启服务。
|
[root@master test]# /etc/init.d/sshd restart 停止 sshd: [确定] 正在启动 sshd: [确定] [root@master test]# |
iptables stop
/etc/init.d/iptables stop关闭防火墙
|
[root@master test]# /etc/init.d/sshd status openssh-daemon (pid 4742) 正在运行... [root@master test]# /etc/init.d/iptables stop iptables:将链设置为政策 ACCEPT:filter [确定] iptables:清除防火墙规则: [确定] iptables:正在卸载模块: [确定] [root@master test]# /etc/init.d/iptables status iptables:未运行防火墙。 [root@master test]# |
su – root/sudo切换用户
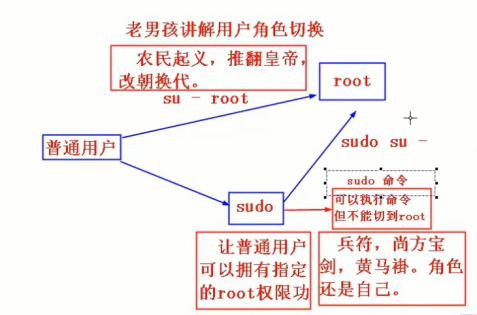
su - root是切换到root上,sudo是授权当前用户权限功能,为了管理上的安全使用sudo。
su – root 输入的是root的密码,sudo su – root输入的是当前用户密码。
如果要用sudo功能,需要编辑sudo权限
|
[root@master test]# visudo ## The COMMANDS section may have other options added to it. ## ## Allow root to run any commands anywhere root ALL=(ALL) ALL boom ALL=(ALL) ALL |
ALL是让sudo拥有所有权限。
如果sudo不加权限切换用户会有如下提示
|
[boom@master ~]$ sudo su - We trust you have received the usual lecture from the local System Administrator. It usually boils down to these three things: #1) Respect the privacy of others. #2) Think before you type. #3) With great power comes great responsibility. [sudo] password for boom: boom 不在 sudoers 文件中。此事将被报告。 |
权限配完后
|
[boom@master ~]$ sudo su - [sudo] password for boom: [root@master ~]# |
使用sudo添加用户
|
[boom@master ~]$ useradd boom03 -bash: /usr/sbin/useradd: 权限不够 [boom@master ~]$ sudo useradd boom03 [sudo] password for boom: [boom@master ~]$ passwd boom03 passwd: 只有根用户才能指定用户名称。 [boom@master ~]$ sudo passwd boom03 更改用户 boom03 的密码 。 新的 密码: 无效的密码: 过于简单化/系统化 无效的密码: 过于简单 重新输入新的 密码: passwd: 所有的身份验证令牌已经成功更新。 [boom@master ~]$ su - boom03 密码: [boom03@master ~]$ exit logout [boom@master ~]$ |
sudo -l 查看当前用户sudo权限
|
[boom@master ~]$ sudo -l 匹配此主机上 boom 的默认条目: requiretty, !visiblepw, always_set_home, env_reset, env_keep="COLORS DISPLAY HOSTNAME HISTSIZE INPUTRC KDEDIR LS_COLORS", env_keep+="MAIL PS1 PS2 QTDIR USERNAME LANG LC_ADDRESS LC_CTYPE", env_keep+="LC_COLLATE LC_IDENTIFICATION LC_MEASUREMENT LC_MESSAGES", env_keep+="LC_MONETARY LC_NAME LC_NUMERIC LC_PAPER LC_TELEPHONE", env_keep+="LC_TIME LC_ALL LANGUAGE LINGUAS _XKB_CHARSET XAUTHORITY", secure_path=/sbin\:/bin\:/usr/sbin\:/usr/bin 用户 boom 可以在该主机上运行以下命令: (ALL) ALL [boom@master ~]$ |
$PATH 、/etc/profile环境变量
echo $PATH 查看环境变量
|
[root@master test]# echo $PATH /usr/local/sbin:/usr/local/bin:/sbin:/bin:/usr/sbin:/usr/bin:/root/bin:/usr/program/sqoop2/bin:/usr/program/sqoop2/server/bin:/bin:/usr/local/sbin:/usr/local/bin:/usr/sbin:/usr/bin:/root/bin:/usr/local/sbin:/usr/local/bin:/usr/sbin:/usr/bin:/root/bin:/usr/program/jdk/bin:/usr/program/jdk/jre/bin |
增加环境变量
|
[root@master test]# echo 'PATH="/root/test/:$PATH"' >> /etc/profile [root@master test]# tail -1 /etc/profile PATH="/root/test/:$PATH" [root@master test]# source /etc/profile [root@master test]# echo $PATH /root/test/:/usr/local/sbin:/usr/local/bin:/sbin:/bin:/usr/sbin:/usr/bin:/root/bin:/usr/program/sqoop2/bin:/usr/program/sqoop2/server/bin:/bin:/usr/local/sbin:/usr/local/bin:。。。 |
netstat
Netstat 命令用于显示各种网络相关信息,如网络连接,路由表,接口状态 (Interface Statistics),masquerade 连接,多播成员 (Multicast Memberships) 等等
-a (all)显示所有选项,默认不显示LISTEN相关
-t (tcp)仅显示tcp相关选项
-u (udp)仅显示udp相关选项
-n 拒绝显示别名,能显示数字的全部转化成数字。
-l 仅列出有在 Listen (监听) 的服?兆刺?
-p 显示建立相关链接的程序名
-r 显示路由信息,路由表
-e 显示扩展信息,例如uid等
-s 按各个协议进行统计
-c 每隔一个固定时间,执行该netstat命令。
提示:LISTEN和LISTENING的状态只有用-a或者-l才能看到
|
[root@master test]# netstat -lntup|grep ssh tcp 0 0 0.0.0.0:22 0.0.0.0:* LISTEN 4742/sshd tcp 0 0 :::22 |
|
[root@master test]# netstat -ap |grep ssh tcp 0 0 *:ssh *:* LISTEN 4742/sshd tcp 0 52 master:ssh 192.168.187.6:ipt-anri-anri ESTABLISHED 1825/sshd tcp 0 0 *:ssh *:* LISTEN 4742/sshd unix 2 [ ] DGRAM 13974 1825/sshd |
查看端口占用情况
|
[root@master test]# netstat -an |grep ':22' tcp 0 0 0.0.0.0:22 0.0.0.0:* LISTEN tcp 0 52 192.168.187.138:22 192.168.187.69:4593 ESTABLISHED tcp 0 0 :::22 |
lsof -i 端口 查看端口状态
|
[root@master test]# lsof -i :22 COMMAND PID USER FD TYPE DEVICE SIZE/OFF NODE NAME sshd 1825 root 3r IPv4 13906 0t0 TCP master:ssh->192.168.187.69:ipt-anri-anri (ESTABLISHED) sshd 4742 root 3u IPv4 17134 0t0 TCP *:ssh (LISTEN) sshd 4742 root 4u IPv6 17136 0t0 TCP *:ssh (LISTEN) |
jps
查看java进程
$LANG、/etc/sysconfig/i18n
|
[root@master test]# cat /etc/sysconfig/i18n LANG="zh_CN.UTF-8" [root@master test]# echo $LANG zh_CN.UTF-8 [root@master test]# |
LANG=en,临时更改字符集
|
ypbind 0:关闭 1:关闭 2:关闭 3:关闭 4:关闭 5:关闭 6:关闭 [root@master test]# LANG=en [root@master test]# chkconfig NetworkManager 0:off 1:off 2:off 3:off 4:off 5:off 6:off abrt-ccpp 0:off 1:off 2:off 3:on 4:off 5:on 6:off |
ntpdate 时间同步
date 查看当前系统时间
|
[root@master test]# date 2017年 02月 03日 星期五 14:27:00 CST |
date -s 设置时间
date -s
date -s 20121019
date -s 23:40:00
|
[root@slave3 ~]# date -s 20170501 2017年 05月 01日 星期一 00:00:00 CST |
/usr/sbin/ntpdate time.nist.gov
同步时间
|
[root@master test]# /usr/sbin/ntpdate time.nist.gov 3 Feb 14:23:12 ntpdate[5814]: step time server 216.229.0.179 offset -260.931788 sec [root@master test]# date 2017年 02月 03日 星期五 14:23:34 CST [root@master test]# |
/etc/crontab与/var/spool/cron 定时任务
/var/spool/cron/
这个目录是以账号来区分每个用户自己的执行计划
-rw-------. /var/spool/cron/root
-rw-------. /var/spool/cron/user1
-rw-------. /var/spool/cron/user2
格式:
*/1 * * * * ls />>/opt/crontab-e 2>&1
|
[root@master test]# echo '*/1 * * * * echo 123 >> /root/test/aaa.txt' > /var/spool/cron/root [root@master test]# cat /var/spool/cron/root */1 * * * * echo 123 >> /root/test/aaa.txt [root@master test]# tail -f aaa.txt 123 123 123 123 123 123 |
crontab 、/etc/crontab系统执行计划
crontab: usage error: unrecognized option
usage: crontab [-u user] file
crontab [-u user] [ -e | -l | -r ]
(default operation is replace, per 1003.2)
-e (edit user's crontab)
-l (list user's crontab)
-r (delete user's crontab)
-i (prompt before deleting user's crontab)
-s (selinux context)
添加系统任务
*/1 * * * * echo 123 >> /root/test/aaa.txt ,每分钟执行一次
|
[root@master test]# crontab -e no crontab for root - using an empty one */1 * * * * echo 123 >> /root/test/aaa.txt |
保存后提示任务开始执行
|
"/tmp/crontab.g7gKVC" 1L, 43C written crontab: installing new crontab [root@master test]# echo abc > aaa.txt [root@master test]# tail -f aaa.txt abc 123 123 |
查看任务
|
[root@master test]# crontab -l */1 * * * * echo 123 >> /root/test/aaa.txt |
删除所有任务
|
[root@master test]# crontab -r [root@master test]# crontab -l no crontab for root |
服务重启
/etc/init.d/crond restart
service crond restart
其他
|
通常情况下,我们会编写一个可执行的sh文件,然后将我们要执行的任务写着sh文件里面,最后通过crontab来执行我们的sh文件即可。
示例:
首先我们在/目录下编写一个task.sh的文件,里面的内容就是我们刚要执行的两条命令: [root@xiaoluo /]# vi task.sh
此时我们的task.sh还不是可执行文件,通过ls -l命令我们可以看到 -rw-r--r--. 1 root root 54 4月 6 16:27 task.sh //tash.sh是不可执行的,我们要修改其权限
所以我们需要通过chmod命令来修改task.sh的权限: [root@xiaoluo /]# chmod 744 task.sh
此时再查看,就发现task.sh已经是可执行文件了: -rwxr--r--. 1 root root 54 4月 6 16:27 task.sh
然后我们输入crontab -e 命令,增加调度任务 * * * * * /task.sh |
|
8,12,16 * * * /data/app/scripts/monitor/df.sh 2 * * * /data/app/scripts/hotbackup/hot_database_backup.sh 8,12,16 * * * /data/app/scripts/monitor/check_ind_unusable.sh 8,12,16 * * * /data/app/scripts/monitor/check_maxfilesize.sh 8,12,16 * * * /data/app/scripts/monitor/check_objectsize.sh 21 * * * 每天的21:43 执行 05 * * * 每天的05:15 执行 17 * * * 每天的17:00 执行 17 * * 1 每周一的 17:00 执行 0,10 17 * * 0,2,3 每周日,周二,周三的 17:00和 17:10 执行 0-10 17 1 * * ?霸?1日从 17:00到7:10 ?案?1分钟 执行 0 1,15 * 1 ?霸?1日和 15日和 一日的 0:00 执行 4 1 * * ?霸?1日的 4:42分 执行 21 * * 1-6 周一到周六 21:00 执行 0,10,20,30,40,50 * * * * 每隔10分 执行 */10 * * * * 每隔10分 执行 * 1 * * * 从1:0到1:59 每隔1分钟 执行 1 * * * 1:00 执行 */1 * * * ?笆?0分 每隔1小时 执行 * * * * ?笆?0分 每隔1小时 执行 8-20/3 * * * 8:02,11:02,14:02,17:02,20:02 执行 5 1,15 * * 1日 和 15日的 5:30 执行 |
/etc/security/limits.conf
文件描述符
|
[root@master test]# cat /etc/security/limits.conf |
/etc/sysctl.conf 内核参数调整配置
内核参数调整配置文件
|
[root@master test]# cat /etc/sysctl.conf # Kernel sysctl configuration file for Red Hat Linux # # For binary values, 0 is disabled, 1 is enabled. See sysctl(8) and # sysctl.conf(5) for more details. # Controls IP packet forwarding net.ipv4.ip_forward = 0 。。。 |
/dev/null
空设备,俗称“黑洞”
|
[root@master test]# cat aaa.txt asdfas [root@master test]# cat /dev/null > aaa.txt [root@master test]# cat aaa.txt [root@master test]# |
|
>/dev/null 2>&1详解
在/var/spool/cron/root 中看到了以下的内容:
30 19 * * * /usr/bin/**dcon.sh > /dev/null 2>&1
#160;这条命令的意思是将标准输出和错误输出全部重定向到/dev/null中,也就是将产生的所有信息丢弃.
1 表示stdout标准输出,系统默认值是1,所以">/dev/null"等同于"1>/dev/null"
command > file 2>file 与command > file 2>&1 有什么不同?
首先~command > file 2>file 的意思是将命令所产生的标准输出信息,和错误的输出信息送到file 中.command > file 2>file 这样的写法,stdout和stderr都直接送到file中, file会被打开两次,这样stdout和stderr会互相覆盖,这样写相当使用了FD1和FD2两个同时去抢占file 的管道.
而command >file 2>&1 这条命令就将stdout直接送向file, stderr 继承了FD1管道后,再被送往file,此时,file 只被打开了一次,也只使用了一个管道FD1,它包括了stdout和stderr的内容.
从IO效率上,前一条命令的效率要比后面一条的命令效率要低,所以在编写shell脚本的时候,较多的时候我们会用command > file 2>&1 这样的写法. |
chattr
chattr +i aaa.txt锁定文件
|
[root@master test]# chattr +i aaa.txt [root@master test]# rm aaa.txt rm:是否删除普通空文件 "aaa.txt"?y rm: 无法删除"aaa.txt": 不允许的操作 |
lsattr 查看属性文件
|
[root@master test]# lsattr -------------e- ./f3 -------------e- ./d3 ----i--------e- ./aaa.txt -------------e- ./b.txt -------------e- ./d2 -------------e- ./res.log |
chattr -i aaa.txt解锁文件
|
[root@master test]# chattr -i aaa.txt [root@master test]# lsattr -------------e- ./f3 -------------e- ./d3 -------------e- ./aaa.txt |
top
查看资源使用情况
|
[root@master proc]# top top - 16:26:00 up 7:56, 2 users, load average: 0.00, 0.00, 0.00 Tasks: 86 total, 1 running, 85 sleeping, 0 stopped, 0 zombie Cpu(s): 0.0%us, 0.0%sy, 0.0%ni, 99.7%id, 0.0%wa, 0.0%hi, 0.3%si, 0.0%st Mem: 502168k total, 476880k used, 25288k free, 84352k buffers Swap: 2064376k total, 0k used, 2064376k free, 242924k cached PID USER PR NI VIRT RES SHR S %CPU %MEM TIME+ COMMAND 6352 root 20 0 15032 1204 944 R 0.3 0.2 0:00.30 top 1 root 20 0 19364 1536 1228 S 0.0 0.3 0:01.88 init 2 root 20 0 0 0 0 S 0.0 0.0 0:00.00 kthreadd 3 root RT 0 0 0 0 S 0.0 0.0 0:00.00 migration/0 4 root 20 0 0 0 0 S 0.0 0.0 0:00.31 ksoftirqd/0 5 root RT 0 0 0 0 S 0.0 0.0 0:00.00 migration/0 6 root RT 0 0 0 0 S 0.0 0.0 0:00.17 watchdog/0 7 root 20 0 0 0 0 S 0.0 0.0 0:02.84 events/0 8 root 20 0 0 0 0 S 0.0 0.0 0:00.00 cgroup &nnbsp; 9 root 20 0 0 0 0 S 0.0 0.0 0:00.00 khelper 10 root 20 0 0 0 0 S 0.0 0.0 0:00.00 netns 11 root 20 0 0 0 0 S 0.0 0.0 0:00.00 async/mgr 12 root 20 0 0 0 0 S 0.0 0.0 0:00.00 pm 13 root 20 0 0 0 0 S 0.0 0.0 0:00.29 sync_supers 14 root 20 0 0 0 0 S 0.0 0.0 0:00.37 bdi-default 15 root 20 0 0 0 0 S 0.0 0.0 0:00.00 kintegrityd/0 16 root 20 0 0 0 0 S 0.0 0.0 0:00.80 kblockd/0 |
按1查看cpu核数
|
[root@slave3 ~]# top top - 12:20:42 up 15 days, 3:50, 2 users, load average: 0.03, 0.02, 0.00 Tasks: 272 total, 1 running, 271 sleeping, 0 stopped, 0 zombie Cpu0 : 0.0%us, 0.1%sy, 0.0%ni, 99.9%id, 0.0%wa, 0.0%hi, 0.0%si, 0.0%st Cpu1 : 0.0%us, 0.0%sy, 0.0%ni, 99.9%id, 0.0%wa, 0.0%hi, 0.0%si, 0.0%st Cpu2 : 0.0%us, 0.0%sy, 0.0%ni,100.0%id, 0.0%wa, 0.0%hi, 0.0%si, 0.0%st Cpu3 : 0.0%us, 0.0%sy, 0.0%ni,100.0%id, 0.0%wa, 0.0%hi, 0.0%si, 0.0%st Cpu4 : 0.0%us, 0.1%sy, 0.0%ni, 99.9%id, 0.0%wa, 0.0%hi, 0.0%si, 0.0%st Cpu5 : 0.0%us, 0.0%sy, 0.0%ni,100.0%id, 0.0%wa, 0.0%hi, 0.0%si, 0.0%st Cpu6 : 0.0%us, 0.0%sy, 0.0%ni,100.0%id, 0.0%wa, 0.0%hi, 0.0%si, 0.0%st Cpu7 : 0.0%us, 0.0%sy, 0.0%ni,100.0%id, 0.0%wa, 0.0%hi, 0.0%si, 0.0%st Cpu8 : 0.0%us, 0.0%sy, 0.0%ni,100.0%id, 0.0%wa, 0.0%hi, 0.0%si, 0.0%st Cpu9 : 0.0%us, 0.0%sy, 0.0%ni,100.0%id, 0.0%wa, 0.0%hi, 0.0%si, 0.0%st Cpu10 : 0.0%us, 0.0%sy, 0.0%ni,100.0%id, 0.0%wa, 0.0%hi, 0.0%si, 0.0%st Cpu11 : 0.0%us, 0.0%sy, 0.0%ni,100.0%id, 0.0%wa, 0.0%hi, 0.0%si, 0.0%st Cpu12 : 0.0%us, 0.0%sy, 0.0%ni, 99.9%id, 0.0%wa, 0.0%hi, 0.0%si, 0.0%st Cpu13 : 0.1%us, 0.2%sy, 0.0%ni, 99.7%id, 0.0%wa, 0.0%hi, 0.0%si, 0.0%st Cpu14 : 0.0%us, 0.0%sy, 0.0%ni,100.0%id, 0.0%wa, 0.0%hi, 0.0%si, 0.0%st Cpu15 : 0.0%us, 0.0%sy, 0.0%ni,100.0%id, 0.0%wa, 0.0%hi, 0.0%si, 0.0%st Mem: 16318204k total, 1231668k used, 15086536k free, 164204k buffers Swap: 983032k total, 0k used, 983032k free, 264888k cached PID USER PR NI VIRT RES SHR S %CPU %MEM TIME+ COMMAND 41891 root 20 0 15160 1468 1004 R 2.1 0.0 0:00.95 top 1 root 20 0 19232 1484 1220 S 0.0 0.0 0:03.31 init 2 root 20 0 0 0 0 S 0.0 0.0 0:00.03 kthreadd 3 root RT 0 0 0 0 S 0.0 0.0 0:00.21 migration/0 4 root 20 0 0 0 0 S 0.0 0.0 0:03.46 ksoftirqd/0 5 root RT 0 0 0 0 S 0.0 0.0 0:00.00 migration/0 6 root RT 0 0 0 0 S 0.0 0.0 0:02.39 watchdog/0 7 root RT 0 0 0 0 S 0.0 0.0 0:00.85 migration/1 8 root RT 0 0 0 0 S 0.0 0.0 0:00.00 migration/1 9 root 20 0 0 0 0 S 0.0 0.0 0:03.77 ksoftirqd/1 |
last lastlog
last
|
[root@localhost test]# last root pts/0 192.168.187.69 Tue Feb 7 17:16 still logged in root tty1 Tue Feb 7 17:16 still logged in reboot system boot 2.6.32-504.el6.i Tue Feb 7 17:15 - 22:14 (04:58) root pts/1 192.168.187.69 Mon Feb 6 16:33 - 17:44 (01:10) root pts/0 192.168.187.69 Mon Feb 6 22:59 - 16:36 (-6:-23) root pts/0 192.168.187.69 Mon Feb 6 22:56 - 22:58 (00:02) root pts/0 192.168.187.69 Mon Feb 6 22:55 - 22:56 (00:00) root pts/0 192.168.187.69 Mon Feb 6 22:54 - 22:55 (00:00) root pts/0 192.168.187.69 Mon Feb 6 22:48 - 22:54 (00:06) root tty1 Mon Feb 6 22:45 - crash (18:30) reboot system boot 2.6.32-504.el6.i Mon Feb 6 22:45 - 22:14 (23:29) |
lastlog
|
[root@localhost test]# lastlog 用户名 端口 来自 最后登陆时间 root pts/0 192.168.187.69 二 2月 7 17:16:27 +0800 2017 bin **从未登录过** daemon **从未登录过** adm **从未登录过** lp **从未登录过** sync **从未登录过** shutdown **从未登录过** halt **从未登录过** mail **从未登录过** uucp **从未登录过** operator **从未登录过** games **从未登录过** gopher **从未登录过** ftp **从未登录过** nobody **从未登录过** vcsa **从未登录过** saslauth **从未登录过** postfix **从未登录过** sshd **从未登录过** ntp **从未登录过** |
ps
ps displays information about a selection of the active processes.
进程状态查询
ps -aux
|
[root@localhost boom]# ps aux USER PID %CPU %MEM VSZ RSS TTY STAT START TIME COMMAND root 1 0.0 0.2 2896 1400 ? Ss 14:44 0:01 /sbin/init root 2 0.0 0.0 0 0 ? S 14:44 0:00 [kthreadd] root 3 0.0 0.0 0 0 ? S 14:44 0:00 [migration/0] root 1304 0.0 0.7 12948 3720 ? Ss 14:58 0:01 sshd: root@pts/0 root 1308 0.0 0.3 6832 1692 pts/0 Ss 14:58 0:00 -bash 。。。 root 1540 0.0 0.2 6540 1068 pts/0 R+ 16:08 0:00 ps aux |
ps -ef
|
[root@localhost boom]# ps -ef UID PID PPID C STIME TTY TIME CMD root 1 0 0 14:44 ? 00:00:01 /sbin/init root 2 0 0 14:44 ? 00:00:00 [kthreadd] root 3 2 0 14:44 ? 00:00:00 [migration/0] root 4 2 0 14:44 ? 00:00:00 [ksoftirqd/0] root 5 2 0 14:44 ? 00:00:00 [stopper/0] root 6 2 0 14:44 ? 00:00:00 [watchdog/0] |
常用参数:
-w 显示加宽可以显示较多的资讯
-A 显示所有进程(等价于-e)(utility)
-a 显示一个终端的所有进程,除了会话引线
-N 忽略选择。
-d 显示所有进程,但省略所有的会话引线(utility)
-x 显示没有控制终端的进程,同时显示各个命令的具体路径。dx不可合用。(utility)
-p pid 进程使用cpu的时间
-u uid or username 选择有效的用户id或者是用户名
-g gid or groupname 显示组的所有进程。
U username 显示该用户下的所有进程,且显示各个命令的详细路径。如:ps U zhang;(utility)
-f 全部列出,通常和其他选项联用。如:ps -fa or ps -fx and so on.
-l 长格式(有F,wchan,C 等字段)
-j 作业格式
-o 用户自定义格式。
v 以虚拟存储器格式显示
s 以信号格式显示
-m 显示所有的线程
-H 显示进程的层次(和其它的命令合用,如:ps -Ha)(utility)
e 命令之后显示环境(如:ps -d e; ps -a e)(utility)
h 不显示第一行
kill
kill 1349 结束进程
kill pid 、kill -15 pid系统会发送一个SIGTERM的信号给对应的程序。当程序接收到该signal后,将会发生以下的事情
l 程序立刻停止
l 当程序释放相应资源后再停止
l 程序可能仍然继续运行
大部分程序接收到SIGTERM信号后,会先释放自己的资源,然后在停止。但是也有程序可以在接受到信号量后,做一些其他的事情,并且这些事情是可以配置的。如果程序正在等待IO,可能就不会立马做出相应。也就是说,SIGTERM多半是会被阻塞的、忽略。
|
[root@localhost redis-3.0.7]# ps -ef | grep redis root 1349 1 0 18:04 ? 00:00:00 ./boom/redis-3.0.7/src/redis-server *:6379 root 1399 1356 0 18:12 pts/0 00:00:00 grep redis [root@localhost redis-3.0.7]# kill 1349 |
kill -9 1349 立即结束进程
-n 指的是 信号编号,kill -9 pid
可以响应 SIGTERM,就是一道必杀令。多半admin会用这个命令。不过,也不是所有的程序都会乖乖听话,总有那些状态下的程序无法立刻相应。
|
[root@localhost redis-3.0.7]# kill -l 1) SIGHUP 2) SIGINT 3) SIGQUIT 4) SIGILL 5) SIGTRAP 6) SIGABRT 7) SIGBUS 8) SIGFPE 9) SIGKILL 10) SIGUSR1 11) SIGSEGV 12) SIGUSR2 13) SIGPIPE 14) SIGALRM 15) SIGTERM 16) SIGSTKFLT 17) SIGCHLD 18) SIGCONT 19) SIGSTOP 20) SIGTSTP 21) SIGTTIN 22) SIGTTOU 23) SIGURG 24) SIGXCPU 25) SIGXFSZ 26) SIGVTALRM 27) SIGPROF 28) SIGWINCH 29) SIGIO 30) SIGPWR 31) SIGSYS 34) SIGRTMIN 35) SIGRTMIN+1 36) SIGRTMIN+2 37) SIGRTMIN+3 38) SIGRTMIN+4 39) SIGRTMIN+5 40) SIGRTMIN+6 41) SIGRTMIN+7 42) SIGRTMIN+8 43) SIGRTMIN+9 44) SIGRTMIN+10 45) SIGRTMIN+11 46) SIGRTMIN+12 47) SIGRTMIN+13 48) SIGRTMIN+14 49) SIGRTMIN+15 50) SIGRTMAX-14 51) SIGRTMAX-13 52) SIGRTMAX-12 53) SIGRTMAX-11 54) SIGRTMAX-10 55) SIGRTMAX-9 56) SIGRTMAX-8 57) SIGRTMAX-7 58) SIGRTMAX-6 59) SIGRTMAX-5 60) SIGRTMAX-4 61) SIGRTMAX-3 62) SIGRTMAX-2 63) SIGRTMAX-1 64) SIGRTMAX |
tar
常用参数
参数说明:
-c --create:建立一个打包文件;
-x --extract:解开一个打包文件;
-t --list:查看 tar包里面的文件;
-z --gzip, --gunzip, --ungzip:打包后用gzip压缩,生成.tar.gz文件;
-j --bzip2:打包后用zip2压缩,生成.tar.bz2文件;
-v --verbose:详细地列出处理的文件
-f --file=ARCHIVE:使用文件名,请留意,在f之后要立即接文件名,不要再加其它参数;
-p :保持原文件的属性;
-P :使用绝对路径来压缩;
-N :设定日期(yyyy/mm/dd),比后面接的日期还要新的文件才会被打包进新建的文件中;
--exclude FILE:在打包的过程中,不要将剔除FILE文件。
实例
1、打包压缩:
tar cvf /dir/file.tar /dir/file #仅打包,不压缩
tar zcvf /dir/file.tar.gz /dir/file #打包后,以gzip压缩
tar jcvf /dir/file.tar.bz2 /dir/file #打包后,以bzip2压缩
tar zcvpf /dir/file.tar.gz /dir/file #打包后,以gzip压缩,并且保留权限信息
tar -N '2007/01/15' zcvf /dir/file.tar.gz /dir/file #打包压缩比2007/01/15新的文件
tar --exclude /dir1/file1 zcvf file.tar.gz /dir1/* /dir2 #打包压缩dir1和dir2中所有文件,除了/dir1/下的file1文件
其实上面的那些后缀,比如tar,tar.gz等等,我们可以省略,只要你知道以什么格式压缩的就行,不然你就没法解压了
2、解压:
tar xvf backup.tar
tar zxvf /dir/file.tar.gz
tar zxvf /dir/file.tar.Z
tar jxvf /dir/file.tar.bz2
tar jxvf /dir/file.tbz
tar -zxvf ./text.tar.gz -C /home/app/test/
修改IP、DNS
查看网络MAC地址
[root@centos ~]# cat /etc/udev/rules.d/70-persistent-net.rules
显示如下信息
# PCI device 0x15ad:0x07b0 (vmxnet3)
SUBSYSTEM=="net", ACTION=="add", DRIVERS=="?*", ATTR{address}=="00:50:56:94:04:3c", ATTR{type}=="1", KERNEL=="eth*", NAME="eth0"
# PCI device 0x15ad:0x07b0 (vmxnet3)
SUBSYSTEM=="net", ACTION=="add", DRIVERS=="?*", ATTR{address}=="00:50:56:94:53:24", ATTR{type}=="1", KERNEL=="eth*", NAME="eth1"
eth0:对应第一张网卡,eth1:对就第二张网卡。当前使用eth0连接路由器,eth1保留(服务器一般用来,连接其它主机)
修改主机名称
[root@centos ~]# vim /etc/sysconfig/network
打开文件,修改以下内容并保存
NETWORKING=yes #使用网络
HOSTNAME=centos #设置主机名称
修改网卡IP为静态IP
[root@centos ~]# vim /etc/sysconfig/network-scripts/ifcfg-eth0
打开文件,修改以下内容并保存
DEVICE=eth0 #对应第一张网卡
TYPE=Ethernet
ONBOOT=yes #是否启动时运行
NM_CONTROLLED=yes
BOOTPROTO=static #static,dhcp使用静态IP,而不是由DHCP分配IP
DEFROUTE=yes
IPV4_FAILURE_FATAL=yes
IPV6INIT=no
NAME="System eth0" #名称
HWADDR=00:50:56:94:04:3C #必须对应etho是的MAC地址(/etc/udev/rules.d/70-persistent-net.rules)
PEERDNS=yes
PEERROUTES=yes
IPADDR=192.168.1.40 #指定本机IP地址
NETMASK=255.255.255.0 #指定子网掩码
GATEWAY=192.168.1.1 #指定网关
修改DNS
root@centos ~]# vim /etc/resolv.conf
打开文件,修改以下内容并保存
nameserver 8.8.8.8 #GOOGLE的DNS服务器
nameserver 61.144.56.100 #指定当前城市最近的DNS服务器(各城市不一样,上网搜索)
nameserver 192.168.1.1 #指定经路由器上指定的DNS服务器
重新启动网络配置
[root@centos ~]#service network restart
重启
[root@centos ~]#shutdown -r now
评论
发表评论
|
|
|