spark系列(二)环境安装与部署配置 有更新!
- 37套精品Java架构师高并发高性能高可用分布式集群电商缓存性能调优设计项目实战视教程 置顶! 有更新!
- 1. 运行环境
- 2. 下载安装
- 3. 修改相关配置
- 1) 配置/etc/profile
- 2) 配置conf/slaves
- 3) 配置conf/spark-env.sh
- 4) 向各节点分发Spark程序
- 5) 各个节点配置/etc/profile
- 4. 启动spark集群
- 5. 浏览器中查看
- 6. spark测试
- 7. 使用Spark-submit测试
37套精品Java架构师高并发高性能高可用分布式集群电商缓存性能调优设计项目实战视教程 置顶! 有更新!
1. 运行环境
l 虚拟机操作系统:CentOS6.5 64位,单核,1G内存
l JDK:1.8 64位
l Hadoop:2.7.3(需要编译为64位)
l Scala:2.11
l Spark:2.0.2
2. 下载安装
http://spark.apache.org/downloads.html
下载对应hadoop以及 scala版本
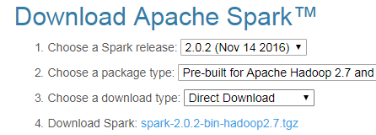
https://d3kbcqa49mib13.cloudfront.net/spark-2.0.2-bin-hadoop2.7.tgz
上传并解压到对应目录
|
[root@master boom]# tar -zxf spark-2.0.2-bin-hadoop2.7.tgz -C /usr/program/ [root@master boom]# cd /usr/program/ [root@master program]# ll 总用量 28 drwxr-xr-x. 8 root root 4096 6月 14 16:33 flume drwxr-xr-x. 10 root root 4096 4月 28 23:37 hadoop drwxr-xr-x. 8 root root 4096 5月 2 13:50 hive drwxr-xr-x. 8 root root 4096 4月 28 22:19 jdk drwxr-xr-x. 6 root root 4096 6月 9 17:34 redis drwxr-xr-x. 6 root root 4096 5月 11 19:37 scala drwxr-xr-x. 12 500 500 4096 11月 8 2016 spark-2.0.2-bin-hadoop2.7 [root@master program]# mv spark-2.0.2-bin-hadoop2.7 ./spark202 |
3. 修改相关配置
1) 配置/etc/profile
定义SPARK_HOME并把spark路径加入到PATH参数中
|
/usr/program/spark202 [root@master spark202]# vi /etc/profile export JAVA_HOME=/usr/program/jdk export HADOOP_HOME=/usr/program/hadoop export PATH=$JAVA_HOME/bin:$HADOOP_HOME/bin:$PATH export PATH=$PATH:/usr/program/scala/bin export SPARK_HOME=/usr/program/spark202 export PATH=$PATH:$SPARK_HOME/bin:$SPARK_HOME/sbin |
2) 配置conf/slaves
|
[root@master conf]# cp slaves.template slaves [root@master conf]# vi slaves # A Spark Worker will be started on each of the machines listed below. master slave1 slave2 ~ |
3) 配置conf/spark-env.sh
|
[root@master conf]# cp spark-env.sh.template spark-env.sh [root@master conf]# vi spark-env.sh # Options for the daemons used in the standalone deploy mode # - SPARK_MASTER_HOST, to bind the master to a different IP address or hostname # - SPARK_MASTER_PORT / SPARK_MASTER_WEBUI_PORT, to use non-default ports for the master # - SPARK_MASTER_OPTS, to set config properties only for the master (e.g. "-Dx=y") # - SPARK_WORKER_CORES, to set the number of cores to use on this machine # - SPARK_WORKER_MEMORY, to set how much total memory workers have to give executors (e.g. 1000m, 2g) # - SPARK_WORKER_PORT / SPARK_WORKER_WEBUI_PORT, to use non-default ports for the worker # - SPARK_WORKER_INSTANCES, to set the number of worker processes per node # - SPARK_WORKER_DIR, to set the working directory of worker processes # - SPARK_WORKER_OPTS, to set config properties only for the worker (e.g. "-Dx=y") # - SPARK_DAEMON_MEMORY, to allocate to the master, worker and history server themselves (default: 1g). # - SPARK_HISTORY_OPTS, to set config properties only for the history server (e.g. "-Dx=y") # - SPARK_SHUFFLE_OPTS, to set config properties only for the external shuffle service (e.g. "-Dx=y") # - SPARK_DAEMON_JAVA_OPTS, to set config properties for all daemons (e.g. "-Dx=y") # - SPARK_PUBLIC_DNS, to set the public dns name of the master or workers export SPARK_MASTER_HOST=master export SPARK_MASTER_PORT=7077 export SPARK_WORKER_CORES=1 export SPARK_WORKER_INSTANCES=1 export SPARK_WORKER_MEMORY=512M |
4) 向各节点分发Spark程序
|
[root@master program]# scp -r spark202 slave1:/usr/program/ slaves.template ... [root@master program]# scp -r spark202 slave2:/usr/program/ slaves.template ... |
5) 各个节点配置/etc/profile
|
export SPARK_HOME=/usr/program/spark202 export PATH=$PATH:$SPARK_HOME/bin:$SPARK_HOME/sbin |
4. 启动spark集群
在主节点上启动spark
|
[root@master sbin]# ./start-all.sh starting org.apache.spark.deploy.master.Master, logging to /usr/program/spark202/logs/spark-root-org.apache.spark.deploy.master.Master-1-master.out |
主节点上配置了master跟slave所以可以看到 master 和 worker进程。
|
[root@master sbin]# jps 4848 NameNode 5024 SecondaryNameNode 6788 Worker 5193 ResourceManager 6846 Jps 6687 Master |
其它节点上只有worker进程
|
[root@slave1 program]# jps 4264 DataNode 5450 Worker 5499 Jps 4333 NodeManager |
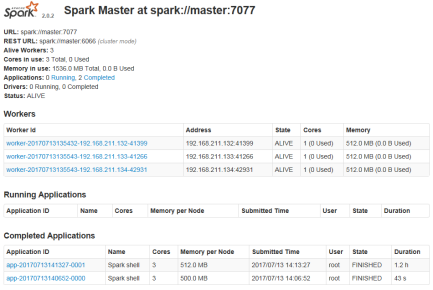
5. 浏览器中查看
在浏览器中输入 http://master:8080
6. spark测试
使用Spark-shell测试,确保hadoop集群已启动
这里我们测试一下在Hadoop中大家都知道的WordCout程序,在MapReduce实现WordCout需要Map、Reduce和Job三个部分,而在Spark中甚至一行就能够搞定。下面就看一下是如何实现的。
启动Spark-shell
由于指定的内存过小导致下面的初始化失败
|
[root@master bin]# ./spark-shell --master spark://master:7077 --executor-memory 510m --driver-memory 500m Using Spark's default log4j profile: org/apache/spark/log4j-defaults.properties Setting default log level to "WARN". To adjust logging level use sc.setLogLevel(newLevel). 17/07/13 14:10:46 WARN NativeCodeLoader: Unable to load native-hadoop library for your platform... using builtin-java classes where applicable 17/07/13 14:10:46 WARN SparkConf: SPARK_WORKER_INSTANCES was detected (set to '1'). This is deprecated in Spark 1.0+. Please instead use: - ./spark-submit with --num-executors to specify the number of executors - Or set SPARK_EXECUTOR_INSTANCES - spark.executor.instances to configure the number of instances in the spark config. 17/07/13 14:10:47 ERROR SparkContext: Error initializing SparkContext. java.lang.IllegalArgumentException: System memory 466092032 must be at least 471859200. Please increase heap size using the --driver-memory option or spark.driver.memory in Spark configuration. at org.apache.spark.memory.UnifiedMemoryManager$.getMaxMemory(UnifiedMemoryManager.scala:212) at org.apache.spark.memory.UnifiedMemoryManager$.apply(UnifiedMemoryManager.scala:194) at org.apache.spark.SparkEnv$.create(SparkEnv.scala:308) at org.apache.spark.SparkEnv$.createDriverEnv(SparkEnv.scala:165) at org.apache.spark.SparkContext.createSparkEnv(SparkContext.scala:256) |
加大指定内存
|
[root@master bin]# ./spark-shell --master spark://master:7077 --executor-memory 512m --driver-memory 600m Using Spark's default log4j profile: org/apache/spark/log4j-defaults.properties Setting default log level to "WARN". To adjust logging level use sc.setLogLevel(newLevel). 17/07/13 14:13:25 WARN NativeCodeLoader: Unable to load native-hadoop library for your platform... using builtin-java classes where applicable 17/07/13 14:13:25 WARN SparkConf: SPARK_WORKER_INSTANCES was detected (set to '1'). This is deprecated in Spark 1.0+. Please instead use: - ./spark-submit with --num-executors to specify the number of executors - Or set SPARK_EXECUTOR_INSTANCES - spark.executor.instances to configure the number of instances in the spark config. 17/07/13 14:13:28 WARN SparkContext: Use an existing SparkContext, some configuration may not take effect. Spark context Web UI available at http://192.168.211.132:4040 Spark context available as 'sc' (master = spark://master:7077, app id = app-20170713141327-0001). Spark session available as 'spark'. Welcome to ____ __ / __/__ ___ _____/ /__ _\ \/ _ \/ _ `/ __/ '_/ /___/ .__/\_,_/_/ /_/\_\ version 2.0.2 /_/ Using Scala version 2.11.8 (Java HotSpot(TM) 64-Bit Server VM, Java 1.8.0_131) Type in expressions to have them evaluated. Type :help for more information. Type :help for more information. scala> |
运行统计脚本使用scala编写:
|
sc.textFile("hdfs://master:9000/boom/test/history.txt").flatMap(_.split(" ")).map(x=>(x,1)).reduceByKey(_+_).map(x=>(x._2,x._1)).sortByKey(false).map(x=>(x._2,x._1)).take(10) |
执行并可以看到输出结果:
|
scala> sc.textFile("hdfs://master:9000/boom/test/history.txt").flatMap(_.split(" ")).map(x=>(x,1)).reduceByKey(_+_).map(x=>(x._2,x._1)).sortByKey(false).map(x=>(x._2,x._1)).take(10) res1: Array[(String, Int)] = Array(("",934), (ll,52), (cd,41), (scp,35), (vi,20), (mkdir,17), (/etc/profile,15), (cat,14), (mapred-site.xml,13), (./*,12)) scala> |
7. 使用Spark-submit测试
从Spark1.0.0开始,Spark提供了一个易用的应用程序部署工具bin/spark-submit,可以完成Spark应用程序在local、Standalone、YARN、Mesos上的快捷部署。该工具 语法及参数说明如下:
|
Usage: spark-submit [options] <app jar | python file> [app options] Options: --master MASTER_URL spark://host:port, mesos://host:port, yarn, or local. --deploy-mode DEPLOY_MODE driver运行之处,client运行在本机,cluster运行在集群 --class CLASS_NAME 应用程序包的要运行的class --name NAME 应用程序名称 --jars JARS 用逗号隔开的driver本地jar包列表以及executor类路径 --py-files PY_FILES 用逗号隔开的放置在Python应用程序 PYTHONPATH上的.zip, .egg, .py文件列表 --files FILES 用逗号隔开的要放置在每个executor工作目录的文件列表 --properties-file FILE 设置应用程序属性的文件放置位置,默认是conf/spark-defaults.conf --driver-memory MEM driver内存大小,默认512M --driver-java-options driver的java选项 --driver-library-path driver的库路径Extra library path entries to pass to the driver --driver-class-path driver的类路径,用--jars 添加的jar包会自动包含在类路径里 --executor-memory MEM executor内存大小,默认1G Spark standalone with cluster deploy mode only: --driver-cores NUM driver使用内核数,默认为1 --supervise 如果设置了该参数,driver失败是会重启 Spark standalone and Mesos only: --total-executor-cores NUM executor使用的总核数 YARN-only: --executor-cores NUM 每个executor使用的内核数,默认为1 --queue QUEUE_NAME 提交应用程序给哪个YARN的队列,默认是default队列 --num-executors NUM 启动的executor数量,默认是2个 --archives ARCHIVES 被每个executor提取到工作目录的档案列表,用逗号隔开 |
该脚本为Spark自带例子,在该例子中个计算了圆周率π的值,以下为执行脚本:
|
[root@master bin]# ./spark-submit --master spark://master:7077 --class org.apache.spark.examples.SparkPi --executor-memory 512m /usr/program/spark202/examples/jars/spark-examples_2.11-2.0.2.jar 100 Using Spark's default log4j profile: org/apache/spark/log4j-defaults.properties 17/07/13 16:15:59 INFO SparkContext: Running Spark version 2.0.2 17/07/13 16:16:00 WARN NativeCodeLoader: Unable to load native-hadoop library for your platform... using builtin-java classes where applicable 17/07/13 16:16:00 WARN SparkConf: SPARK_WORKER_INSTANCES was detected (set to '1'). This is deprecated in Spark 1.0+. |
参数说明(详细可以参考上面的参数说明):
l --master Master所在地址,可以有Mesos、Spark、YARN和Local四种,在这里为Spark Standalone集群,地址为spark://master:7077
l --class应用程序调用的类名,这里为org.apache.spark.examples.SparkPi
l --executor-memory 每个executor所分配的内存大小,这里为512M
l 执行jar包 这里是..../spark-examples_2.11-2.0.2.jar
l 分片数目 这里数目为100
|
17/07/13 16:16:07 INFO TaskSetManager: Starting task 99.0 in stage 0.0 (TID 99, 192.168.211.134, partition 99, PROCESS_LOCAL, 5446 bytes) 17/07/13 16:16:07 INFO CoarseGrainedSchedulerBackend$DriverEndpoint: Launching task 99 on executor id: 2 hostname: 192.168.211.134. 17/07/13 16:16:07 INFO TaskSetManager: Finished task 97.0 in stage 0.0 (TID 97) in 43 ms on 192.168.211.134 (97/100) 17/07/13 16:16:07 INFO TaskSetManager: Finished task 98.0 in stage 0.0 (TID 98) in 28 ms on 192.168.211.133 (98/100) 17/07/13 16:16:07 INFO TaskSetManager: Finished task 99.0 in stage 0.0 (TID 99) in 12 ms on 192.168.211.134 (99/100) 17/07/13 16:16:08 INFO TaskSetManager: Finished task 4.0 in stage 0.0 (TID 4) in 1786 ms on 192.168.211.132 (100/100) 17/07/13 16:16:08 INFO DAGScheduler: ResultStage 0 (reduce at SparkPi.scala:38) finished in 3.054 s 17/07/13 16:16:08 INFO TaskSchedulerImpl: Removed TaskSet 0.0, whose tasks have all completed, from pool 17/07/13 16:16:08 INFO DAGScheduler: Job 0 finished: reduce at SparkPi.scala:38, took 3.317929 s Pi is roughly 3.1418811141881116 |
评论
发表评论
|
|
|