Jbomo框架系列教程(四)-分库分表 有更新!
- 第四章:分库分表
- 概述
- Inline策略分表示例
- 初始化表结构
- 实体类及分片注解
- 服务类实现
- Module配置类
- 业务测试类
- 工程目录结构
- Standard策略分表示例
- 业务场景说明
- 初始化表结构
- 分表路由算法实现
- 实体类及分片注解
- 服务类实现
- Module配置类
- 业务测试类
- 工程目录结构
- 分库示例
- 注解说明
- 注意事项
第四章:分库分表
概述
分库分表功能基于shardingSphere实现,目前支持以下几种分片路由策略:
- 标准分片策略(Standard)
对应StandardShardingStrategy。提供对SQL语句中的=, IN和BETWEEN AND的分片操作支持。 StandardShardingStrategy只支持单分片键,提供PreciseShardingAlgorithm和RangeShardingAlgorithm两个分片算法。PreciseShardingAlgorithm是必选的,用于处理=和IN的分片。RangeShardingAlgorithm是可选的,用于处理BETWEEN AND分片,如果不配置RangeShardingAlgorithm,SQL中的BETWEEN AND将按照全库路由处理。
- 行表达式分片策略(Inline)
对应InlineShardingStrategy。使用Groovy的表达式,提供对SQL语句中的=和IN的分片操作支持,只支持单分片键。对于简单的分片算法,可以通过简单的配置使用,从而避免繁琐的Java代码开发,如: t_user_$->{u_id % 8} 表示t_user表根据u_id模8,而分成8张表,表名称为t_user_0到t_user_7。
- 复合分片策略(Complex)
对应ComplexShardingStrategy。复合分片策略。提供对SQL语句中的=, IN和BETWEEN AND的分片操作支持。ComplexShardingStrategy支持多分片键,由于多分片键之间的关系复杂,因此并未进行过多的封装,而是直接将分片键值组合以及分片操作符透传至分片算法,完全由应用开发者实现,提供最大的灵活度。
Inline策略分表示例
该示例代码拷贝至上述ORM示例,示例中将把id当做分片字段,以“id%6”的值作为物理表的后缀t_person_x,t_person为逻辑表。
初始化表结构
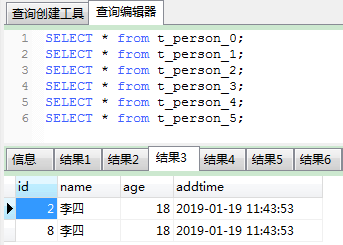
创建6张物理分区表,分别为t_person_0,t_person_1,t_person_2 … t_person_5,表结构必须都一样。
CREATE TABLE `t_person_0` (
  `id` int(11) NOT NULL,
  `name` varchar(255) DEFAULT NULL,
  `age` int(5) DEFAULT NULL,
  `addtime` char(20) DEFAULT NULL,
  PRIMARY KEY (`id`)
) ENGINE=InnoDB DEFAULT CHARSET=utf8;

CREATE TABLE t_person_1 SELECT * FROM t_person_0 WHERE 1=2;
CREATE TABLE t_person_2 SELECT * FROM t_person_0 WHERE 1=2;
CREATE TABLE t_person_3 SELECT * FROM t_person_0 WHERE 1=2;
CREATE TABLE t_person_4 SELECT * FROM t_person_0 WHERE 1=2;
CREATE TABLE t_person_5 SELECT * FROM t_person_0 WHERE 1=2;
由于该示例中以id作为分片字段,所以id不能为自增字段。
配置数据源
#分表不分库数据源配置
jbomo.datasource.shardingexample04.url =jdbc:mysql://192.168.2.169/jbomo-example-04?characterEncoding=utf8&zeroDateTimeBehavior=convertToNull
jbomo.datasource.shardingexample04.user = admin_union
jbomo.datasource.shardingexample04.password =gM_v9og51Pn_BRcT2d8R
jbomo.datasource.shardingexample04.partitionEnable=true
实体类及分片注解
Person实体加上分片注解,如下:
@Partition(
        actualDataNodes = "shardingexample04.t_person_${0..5}",
        databaseShardingStrategy = Partition.Strategy.none,
        tableShardingStrategy = Partition.Strategy.inline,
        tableInline = @Inline(shardingColumn = "id",algorithmExpression = "t_person_${id%6}")
)
public class Person extends Model<Person> {
}
"shardingexample04.t_person_${0..5}"是用来声明物理表命名方式,{0..5}代表有6张0,1,2,3,4,5为后缀的物理表。不分库,分表采用inline,指定id为分片字段。可以在algorithmExpression中使用简单的算术表达式,具体参考ShardingSphere官网。
服务类实现
public class PersonService extends Service<Person> {

    public List<Person> findByAge(int age) {
        String sql = "select * from " + table.getName() + " where age = ? order by addtime";
        List<Person> persons = dao.find(sql, age);
        return persons;
    }

    // sharding 不支持预处理,所以deleteByIds方法得重写才能用
    public int deleteByIds(String ids){
       return Db.use(datasource()).update(String.format("delete from %s where id in (%s)",table.getName(),ids).toString());
    }

}
由于sharding 不支持预处理,默认Service的deleteByIds用了sql预处理,所以deleteByIds方法得重写才能正常使用
Module配置类
public class Example04Module extends DaoModule {
    @Override
    public void configTable(Tables tables) {
        tables.add("t_person", Person.class,"shardingexample04");
    }
}
必须指定数据源为配置中的分表数据源shardingexample04
业务测试类
public class Example04Appliaction {
    public static void main(String[] args) {
        Jbomo.run();
        doPersonTest();
    }

    private static void doPersonTest() {

        PersonService personService = new PersonService();

        for (int i = 1; i < 10; i++) {
            Person person = new Person();
            person.set("id",i).set("name","李四").set("age",18).set("addtime", DateUtil.getCurDateTimeStr());
            personService.save(person);
        }

        // 根据ID加载Person对象
        Person person1 = personService.findById(3);
        System.out.println(person1.toJson());

        // 根据年龄获取Person列表
        personService.findByAge(18).stream().forEach(p -> {
            System.out.println(p.toJson());
        });

        // 清除数据
        personService.deleteByIds("1,2,3,4,5,6,7,8,9");

    }
}
{"addtime":"2019-01-19 11:42:45","name":"李四","id":3,"age":18}
{"addtime":"2019-01-19 11:42:45","name":"李四","id":6,"age":18}
{"addtime":"2019-01-19 11:42:45","name":"李四","id":5,"age":18}
{"addtime":"2019-01-19 11:42:45","name":"李四","id":4,"age":18}
{"addtime":"2019-01-19 11:42:45","name":"李四","id":3,"age":18}
{"addtime":"2019-01-19 11:42:45","name":"李四","id":2,"age":18}
{"addtime":"2019-01-19 11:42:45","name":"李四","id":9,"age":18}
{"addtime":"2019-01-19 11:42:45","name":"李四","id":8,"age":18}
{"addtime":"2019-01-19 11:42:45","name":"李四","id":1,"age":18}
{"addtime":"2019-01-19 11:42:45","name":"李四","id":7,"age":18}
注释掉清除测试数据代码后,可以在数据库查看数据分表效果,如下:
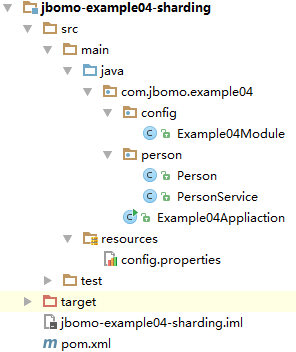
工程目录结构
Standard策略分表示例
业务场景说明
该示例来自比价采集系统的商品分表,把id当做分片字段,但是id不是int类型,而是字符串类型。id由"站点ID-商品号-商品套餐号"组成,eg:(0_234234234_343434343)。站点id为淘宝/天猫/京东等等的枚举ID,商品号为各平台的商品ID,商品套餐号为商品的套餐组合ID。
示例中将按站点ID 跟 商品套餐号的哈希值摸上3进行分表。意味着每个站点分3张表进行存储,如:(t_hello_0_0,t_hello_0_1,t_hello_0_2)。该示例中有4个站点,所以将有12张物理分表。
初始化表结构
创建12张表结构一样的物理表:
CREATE TABLE `t_hello_0_0` (
  `id` char(50) NOT NULL,
  `type` int(11) DEFAULT NULL,
  `message` varchar(255) DEFAULT NULL
) ENGINE=InnoDB DEFAULT CHARSET=utf8;

CREATE TABLE t_hello_0_1 SELECT * FROM t_hello_0_0 WHERE 1=2;
CREATE TABLE t_hello_0_2 SELECT * FROM t_hello_0_0 WHERE 1=2;
CREATE TABLE t_hello_1_0 SELECT * FROM t_hello_0_0 WHERE 1=2;
CREATE TABLE t_hello_1_1 SELECT * FROM t_hello_0_0 WHERE 1=2;
CREATE TABLE t_hello_1_2 SELECT * FROM t_hello_0_0 WHERE 1=2;
CREATE TABLE t_hello_2_0 SELECT * FROM t_hello_0_0 WHERE 1=2;
CREATE TABLE t_hello_2_1 SELECT * FROM t_hello_0_0 WHERE 1=2;
CREATE TABLE t_hello_2_2 SELECT * FROM t_hello_0_0 WHERE 1=2;
CREATE TABLE t_hello_3_0 SELECT * FROM t_hello_0_0 WHERE 1=2;
CREATE TABLE t_hello_3_1 SELECT * FROM t_hello_0_0 WHERE 1=2;
CREATE TABLE t_hello_3_2 SELECT * FROM t_hello_0_0 WHERE 1=2;
配置数据源
#分表不分库数据源配置
jbomo.datasource.shardingexample04.url =jdbc:mysql://192.168.2.169/jbomo-example-04?characterEncoding=utf8&zeroDateTimeBehavior=convertToNull
jbomo.datasource.shardingexample04.user = admin_union
jbomo.datasource.shardingexample04.password =gM_v9og51Pn_BRcT2d8R
jbomo.datasource.shardingexample04.partitionEnable=true
分表路由算法实现
public class MyPreciseShardingAlgorithm implements PreciseShardingAlgorithm<String> {

    public String doSharding(Collection<String> tableNames,
                             final PreciseShardingValue<String> shardingValue) {
        String[] spids = shardingValue.getValue().split("_");
        if (spids == null || spids.length != 3) {
            throw new UnsupportedOperationException();
        }

        // 按站点ID 跟 商品套餐号的哈希值摸上3进行分表
        String shardtablename = shardingValue.getLogicTableName()
                + "_" + spids[0]
                + "_" + (Math.abs(spids[1].hashCode() % 3));
        return shardtablename;
    }
}
实体类及分片注解
@Partition(
        // 指定物理表匹配模式,0..3代表0,1,2,3
        actualDataNodes = "shardingexample04.t_hello_${0..3}_${0..2}",
        // 数据库路由策略,none:不进行数据库路由
        databaseShardingStrategy = Partition.Strategy.none,
        // 表路由策略,standard:使用通用路由算法
        tableShardingStrategy = Partition.Strategy.standard,
        tableStandard = @Standard(shardingColumn = "id",preciseShardingAlgorithm = MyPreciseShardingAlgorithm.class)
)

public class Hello extends Model<Hello> {
}
服务类实现
public class HelloService extends Service<Hello> {
}
这里使用默认通用方法就够了。
Module配置类
public class Example0402Module  extends DaoModule {
    public void configTable(Tables tables) {
        tables.add("t_hello", Hello.class,"shardingexample04");
    }
}
必须指定数据源为配置中的分表数据源shardingexample04
业务测试类
public class Example0402Appliaction {

    public static void main(String[] args) {
        Jbomo.run();
        doHelloTest();
    }

    private static void doHelloTest() {
        HelloService helloService = new HelloService();
        for (int i = 0; i <10 ; i++) {
            Hello hello = new Hello();
            hello.set("type",1).set("message", DateUtil.getCurDateTimeStr()+"--测试");
            long sid = RandomUtil.randomNumberRange(0,3);
            String s1 = RandomUtil.buildRandomNum(8);
            hello.set("id",sid+"_"+s1+"_"+s1);
            helloService.save(hello);
        }

        helloService.paginate(1,20).getList().forEach(hello -> {
            System.out.println(hello.toJson());
        });

    }

}
{"id":"3_62312655_62312655","type":1,"message":"2019-01-19 16:29:44--测试"}
{"id":"3_16351453_16351453","type":1,"message":"2019-01-19 16:29:44--测试"}
{"id":"2_88591244_88591244","type":1,"message":"2019-01-19 16:29:44--测试"}
{"id":"2_72482378_72482378","type":1,"message":"2019-01-19 16:29:45--测试"}
{"id":"2_36306497_36306497","type":1,"message":"2019-01-19 16:29:44--测试"}
{"id":"1_87625323_87625323","type":1,"message":"2019-01-19 16:29:44--测试"}
{"id":"1_73306333_73306333","type":1,"message":"2019-01-19 16:29:44--测试"}
{"id":"1_70216942_70216942","type":1,"message":"2019-01-19 16:29:44--测试"}
{"id":"1_51903251_51903251","type":1,"message":"2019-01-19 16:29:44--测试"}
{"id":"0_42171313_42171313","type":1,"message":"2019-01-19 16:29:44--测试"}
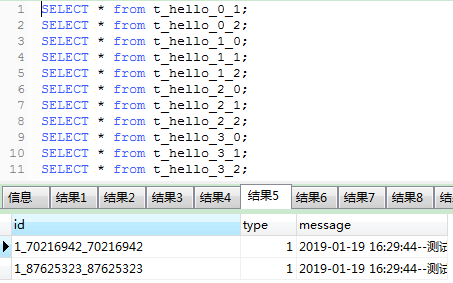
数据库中可以查看到数据分表效果:
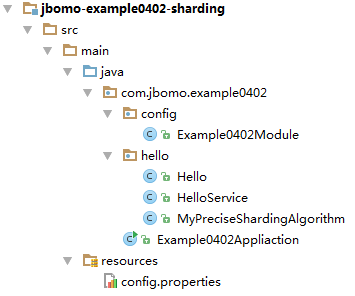
工程目录结构
分库示例
…
注解说明
-
actualDataNodes
"shardingexample04.t_person_${0..5}"是用来声明物理表命名方式,{0..5}代表有6张0,1,2,3,4,5为后缀的物理表。 -
databaseShardingStrategy
库分片策略指定,包含下面4种方式:
	Partition.Strategy.none,不分库
	inline,行表达式策略
	standard,标准策略
	complex,组合策略
- tableShardingStrategy
表分片策略指定,具体说明同databaseShardingStrategy
- databaseInline
当databaseShardingStrategy为inline时需要配置注解 @Inline
- databaseStandard
当databaseShardingStrategy为standard时需要配置注解 @standard
- databaseComplex
当databaseShardingStrategy为complex时需要配置注解 @complex
- tableInline
当tableShardingStrategy为inline时需要配置注解 @Inline
- tableStandard
当tableShardingStrategy为standard时需要配置注解 @standard
- tableComplex
当tableShardingStrategy为complex时需要配置注解 @complex
注意事项
**当分片字段不是物理表主键的时候,不能使用Service.update(Model)更新实体,**因为update和select都是通过where语句中的条件,当条件中包含分片字段才会走分片路由,而service.update(model)底层都将解析成"update *** where 主键=xxx",所以当分片字段不是主键的时候操作范围将是全局的,也就是所有的物理表都会被更新到。当分片字段刚好是物理表的主键时,update(model)才会走分片路由。
评论
发表评论
|
|
|